Description
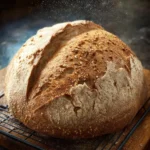
This gluten free crusty bread is made with a blend of gluten free flour and psyllium husks, creating a realistic texture and delicious taste.
Ingredients
Scale
- 488 grams gluten free flour blend (* See Notes)
- 2 1/2 teaspoons rapid yeast (1 packet)
- 16 grams psyllium husks (* See Notes)
- 2 1/2 cups purified water (* See Notes)
Instructions
- Before you make this bread, prepare your psyllium husk gel. Measure the psyllium husks using a digital scale and place them into a small bowl. Add the husks to 1 1/2 cups of water and mix. Let it sit for 5 minutes until it forms a gel.
- In the bowl of a stand mixer, add the remaining water, psyllium gel, flour, sugar, and rapid yeast. Add a paddle attachment and turn the mixer on low to incorporate the ingredients. Turn the speed up to medium and let the dough mix well. It is finished mixing when it pulls away from the edges of the mixer bowl.
- Remove the dough and place it onto a flour-dusted silicone mat. Your dough should be tacky but easy to work.
- Roll the dough into a ball, then press it down into a large circle.
- Fold over the ends to give the dough a bit of structure so it rises upward better. Flip the dough over and shape it into a ball.
- Place the dough into a round banneton to rise in a round shape. You can also make it oval-shaped using an oval banneton basket.
- Cover the banneton loosely with plastic wrap, or use a disposable shower cap and wrap it over the basket, and put the dough in a warm spot to rise. The dough should double in size, about 45 minutes, if it is warm. If it is cooler, the rise time will take longer.
- Preheat the oven to 450ºF with a Dutch oven with the lid on in the oven. You can bake the bread in a Dutch oven or place the dough onto a parchment paper-lined baking sheet.
- Use a bread lame to make a slash in the dough.
- Carefully remove the Dutch oven or baking sheet from the oven. If using a Dutch oven, drop the dough in and put the lid on. Return it to the oven.
- If using the baking dish and pan method, place the bread on the baking sheet and drop 4-5 ice cubes into the hot pan below and quickly close the oven door.
- Bake the bread for 40-45 minutes. The bread should look golden brown on the outside and have an internal temperature of 210ºF.
- Put on oven mitts and carefully remove the Dutch oven from the oven. Use the parchment paper to lift the bread out and transfer it to a cooling rack.
- Do not slice the bread until it is fully cooled. If you slice it while it is warm, the bread will be a little gummy.
Notes
- Make sure to measure the psyllium husks accurately as they are crucial for the bread texture.
- Using a digital scale can help in achieving precise measurements.
- Allow the bread to cool fully before slicing to avoid a gummy texture.
- Prep Time: 15 minutes
- Cook Time: 45 minutes
- Category: Bread
- Method: Baking
- Cuisine: Gluten Free
Nutrition
- Serving Size: 1 slice
- Calories: 200
- Sugar: 1g
- Sodium: 200mg
- Fat: 3g
- Saturated Fat: 0.5g
- Unsaturated Fat: 2g
- Trans Fat: 0g
- Carbohydrates: 40g
- Fiber: 4g
- Protein: 6g
- Cholesterol: 0mg